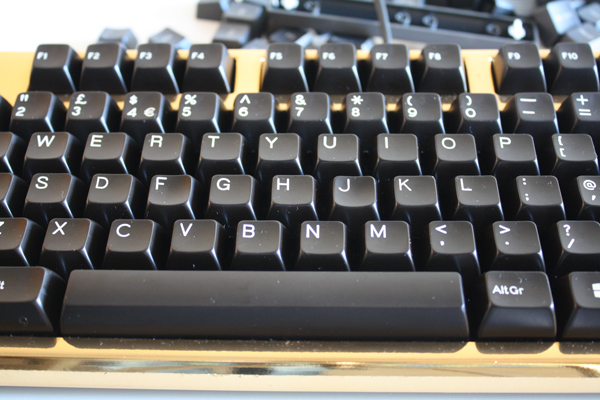
Diatec recently released a new set of keycaps for their Filco Majestouch line of mechanical keyboards: The Filco Double Shot keyset.
The name comes from the double-shot moulding process used, where two plastics of different colours are made into a single keycap. The result is a keycap with perfect legends, which never wear down, cannot be felt and looks clean. The Filco Double Shot keycaps also have a higher profile, a more rounded shape and a higher weight compared to standard Filco keycaps. This makes for a different typing feel, which I’ll describe in more detail later.
The Filco Double Shot keycaps are available now from The Keyboard Company in multiple layouts:
- Double Shot Filco – USA Keyset (104 keys)
- Double Shot Filco – UK Keyset (105 keys)
- Double Shot Filco – German Keyset (105 keys)
- Double Shot Filco – French Keyset (105 keys)
- Double Shot Filco – Swedish/Finnish Keyset (105 keys)
- Double Shot Filco – Japanese Keyset (108 keys)
In this article, I’ll show you how to install these new keycaps, then give my own impressions after using the keycaps for a couple of weeks.
Installation Instructions
Part 1: Removing your existing keycaps
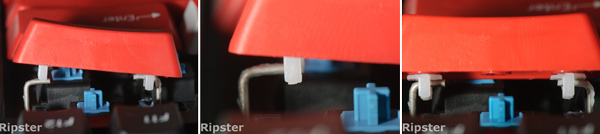
Some illustrations taken from Ripster’s excellent guide to removing Cherry MX keys.
First things first: to install your new keycaps, you’ll need to remove your existing keycaps first.
Use a key puller to carefully remove each key by sliding the metal portion under the keycap, and pulling up slowly while wiggling from side to side. If you rip off the keycap too swiftly, you may do damage to the switch below.
Remove all of the smaller keys first, but leave the larger keycaps which have metal stabilisers beneath: the space bar, backspace, enter, right shift (and left shift if you are using a USA layout keyboard). If you have a full format keyboard (with numberpad), remove all keycaps on the numberpad section apart from the larger zero, addition and equals keys. Once all of the smaller keycaps are clear, you’ll find it easier to remove the ones with stabilisers.
The space bar comes off first. Use your fingers to lift both sides gently, then push against one side to free the peg from the metal stabiliser bar. Once one side is free, you can move in the opposite direction to finish taking off the switch.
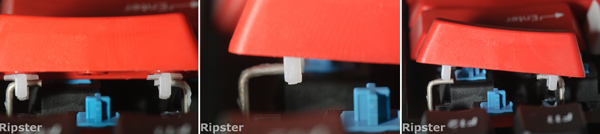
Now use the same technique on the other keys: lift each keycap gently until it clears the stem, push on one side to free the metal from the peg, then move the other way remove the keycap.
Note: As your new Filco Double Shot keycaps already include the little plastic pegs, there’s no need to take them out of your existing keycaps.
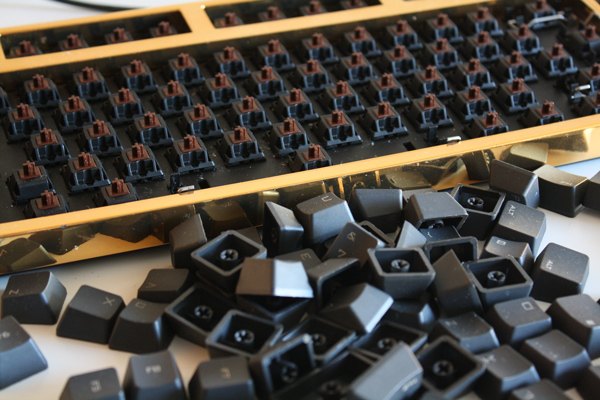
Once all of the keycaps are removed, you’re free to proceed onto the next part – installing your new Filco Double Shot keycaps. You may find it helpful to clean your keyboard of fluff at this stage, as it’s much easier with all keycaps removed.
Part 2: Installing your new keycaps
Now it’s time to install your new keycaps. Cut open one end of the vacuum-packed bag and slide out the tray of keycaps. These are just sitting on a piece of plastic and aren’t secured once the vacuum seal has been broken, so keep the keycaps flat as you take them out of the bag to avoid tipping them on the floor as I did!
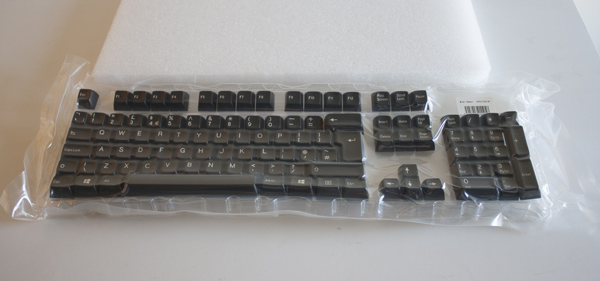
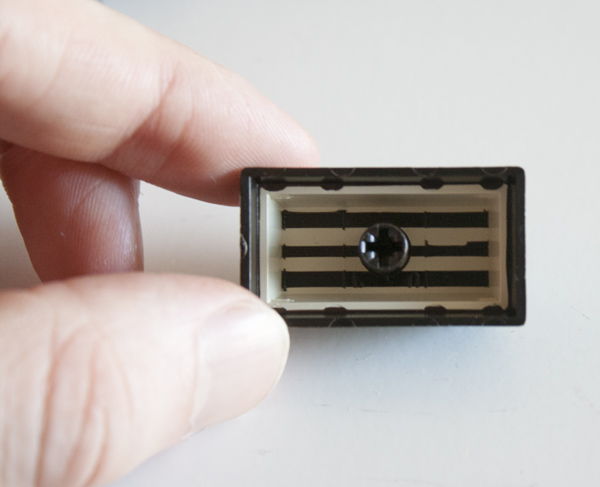
Note that each of the larger keycaps comes with the plastic stabiliser pegs already glued into position. The overhanging end of these pegs point towards the back end of the keys, so keep that in mind as you’re installing them.
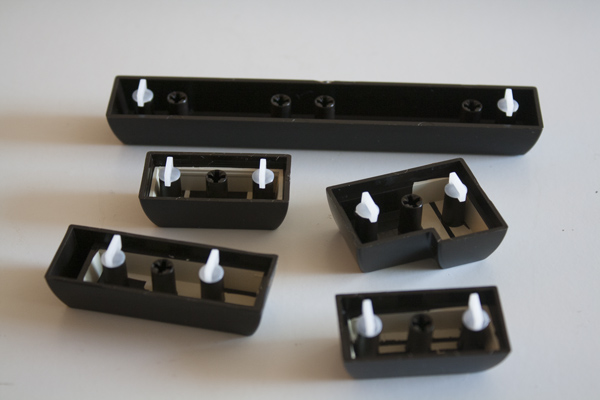
Take each of the stabilised larger keycaps and install them onto your keyboard, using the opposite method to what we did before: slide the peg onto the metal wire, push and hold in that direction to flex the wire, then move the other side down such that the metal goes into the peg.
Once the pegs are in position on both sides, move the centre of the keycap over the switch and push down gently to finish installing the keycap. It may be helpful to press the key a few times to make sure it’s seated properly.
Once each stabilised key is installed, then the rest of the job is quite simple – just place each small keycap on its relevant switch and press down to seat it.
Once every keycap is installed, you’re done!
Review
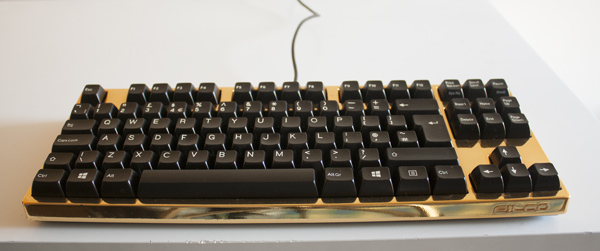
After a couple of weeks of using these keycaps, I’ve become quite fond of them. They provide a subtly different look to the keyboard that I’ve installed them on, thanks to their higher clearance and rounded shape. The overall appearance is a little retro, and it makes them stand out from other keycaps on the market. I’ve only seen these keycaps used on a few other keyboards, but I’ve been impressed how they look each time.
I like how the keycaps indicate the F and J keys (the ‘home position’ for your left and right index fingers with a more spherical, more deeply welled shape. It’s a subtle difference when you’re looking at it, but it works perfectly when you’re typing.
The increased weight of the keycaps mean less force is needed to actuate each key, which gives the keyboard a slightly lighter feel.
The change in keycap weight also makes for a slightly louder sound, both as you actuate the switch and as you bottom out each key. It’s a refreshing difference that’s made me switch back to my Majestouch-2 after spending quite some time on the Max Keyboard Blackbird.
Of course, one of the biggest benefits of these keycaps is that the legends will never wear away, even after years and years of use. Diatec have produced a few different keycap designs to prevent this issue, such as front-printed (Ninja) keycaps and blank keycaps, but if you prefer the look and utility of top-printed legends then these double shot keycaps are the perfect solution.
Ultimately, I’m pleased with the look, feel and durability of these keycaps, and I think they’ll be staying on my Majestouch-2 for a long time.
For more details or to order these keycaps for yourself, visit The Keyboard Company website:
- Double Shot Filco – USA Keyset (104 keys)
- Double Shot Filco – UK Keyset (105 keys)
- Double Shot Filco – German Keyset (105 keys)
- Double Shot Filco – French Keyset (105 keys)
- Double Shot Filco – Swedish/Finnish Keyset (105 keys)
- Double Shot Filco – Japanese Keyset (108 keys)
You might also want to read this user review from /u/Fogge on Reddit.
Thanks for checking out the article, and be sure to let us know what you think of the keycaps on Twitter @keyboardco, on Facebook or in the comments below.
Can you give any tips on how to remove the ESC key? This keyset is so wide that there is no room for the Filco key cap puller when trying to remove the ESC key. Thanks.
Sure. I just tried it a few times; here’s what I found. If you just place one half of the key puller on one side and push it down until it goes under the key cap, then you can carefully lift up from there. Because it is tight on the opposite side, you’ll find just having that one wire from the key puller is enough to pull it out evenly.
not cheap but if they triple/quadrupled the joy of typing on my Filco!
Hi — any chance of a side-by-side shot of a couple of keys so we can see the height difference?
Is this OK? I’m at work so I don’t have the caps with me at the moment, but this photo (particularly the top part) shows the difference between the taller double shots and the standard ABS caps from a Majestouch-2.
http://i.imgur.com/zh849CF.jpg
That’s excellent, thanks. They look kinda “vintage” to me and I’m really looking for something vintage-y (should there be such a word) — this looks like a possibility.
Right on! If you pick them up, I hope you enjoy ’em!
Will they fit on another Keyboard with MX Keyswitches aswell? The Shop tells me, there is something special about these caps, which is somewhat weird, since the Majestouch 2 has MX switches itself.
The keycaps have Filco-style stabilisers glued into place, so they won’t fit onto other keyboards with a different style of stabilisers.
Are these caps compatible with o-rings? Considering this sentence:
“Note that each of the larger keycaps comes with the plastic stabiliser pegs already glued into position.”
I kinda need to know since I am seriously considering buying these caps with blue o-rings.
Yes, they are compatible with o rings.